WattNode® BACnet® Firmware Upgrade with Tridium® Niagara® WorkPlaceAX
Overview
This article describes how to upgrade the firmware on a WattNode® BACnet® (WNC series) using the Tridium Niagara WorkPlaceAX (formerly called Workbench, part of the AXSupervisor software package). This assumes you are familiar with the WorkPlaceAX software and that the WattNode BACnet meter is already installed on the JACE.
The following table lists each available firmware upgrade and its file size, checksum and MD5 hash which can be used to verify that you received the proper firmware image file intact. Use BACnet-1.04to1.13.bin if you are upgrading from a firmware version earlier than 1.10. If you are upgrading from 1.10 or a later version, use BACnet-1.1xto1.13.bin.
| Firmware File | File Size (bytes) |
Checksum | MD5 Hash | Status |
|---|---|---|---|---|
| BACnet-1.04to1.13.bin | 75024 | 3442439853 | ed17e89366946f3848d6f72b83f334f8 |
Current |
| BACnet-1.1xto1.13.bin | 74944 | 856368332 | d060a874398d1f7ec7d871fdac3a91ea |
Current |
| BACnet-1.04to1.10.bin | 71440 | 1458336085 | 2d5d55e2ee721d388de342efcdc5a024 |
Obsolete |
Baud Rate
This procedure has been tested with baud rates of 38,400 and 76,800. At 38,400 baud, the file write time is approximately 45 seconds. File writes that take more than one minute may result in Station Timeout on the JACE unless the timeout is adjusted. Therefore, baud rates of 9,600 and 19,200 are likely to time out.
Procedure
Obtain the Firmware Image
The latest firmware image can be obtained from Continental Control Systems technical support. Copy the supplied file to a local PC or memory card. In this example the code is stored on a memory card as I:BACnet-1.04to1.10.bin.
NOTE – V1.03 WattNode meters do not support field firmware upgrading and must be returned to the factory to be upgraded.
Transfer the Firmware Image File to the JACE
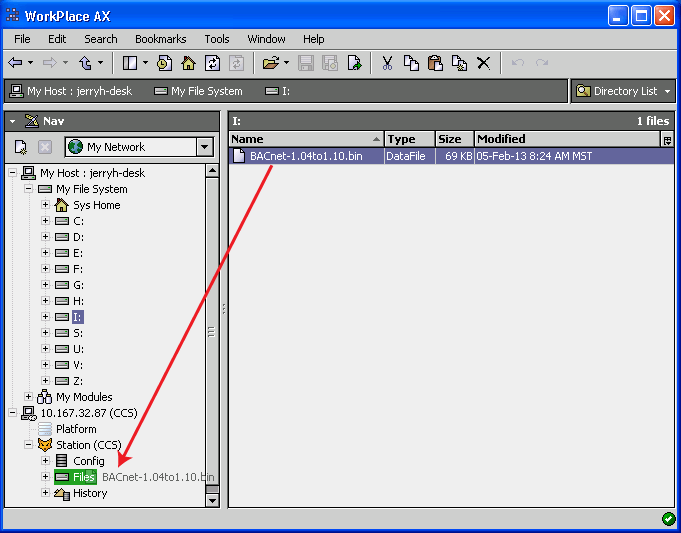
Copy I:BACnet-1.04 to 1.10.bin to the Station > Files directory using the Nav sidebar as illustrated in Figure 1, where the red line indicates the “drag-and-drop” mouse action that transfers the file from the source directory on the computer file system to the destination folder on the JACE.
Select the Meter to Update
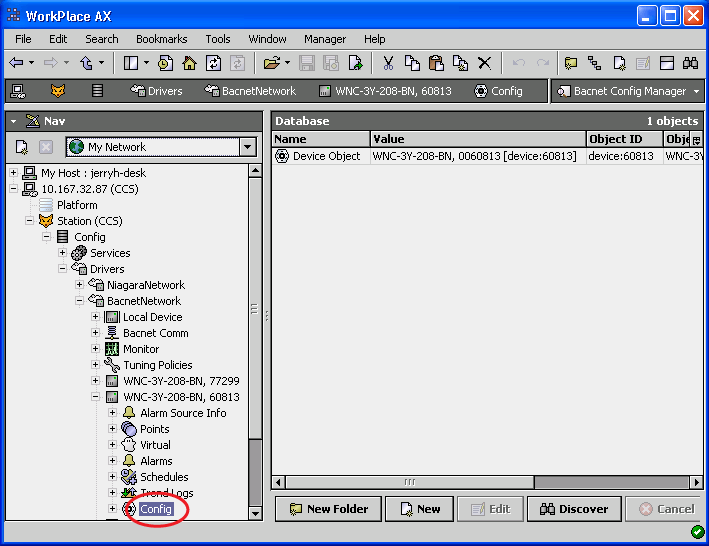
In this example a WNC-3Y-208-BN, SN 60813, shown in Figure 2 will be updated.
- Under this device folder (Station > Config > BacnetNetwork > WNC-3Y-208-BN, 60813) double-click on Config to open the Bacnet Config Manager:
Add the “BACnet Firmware Image” File Object
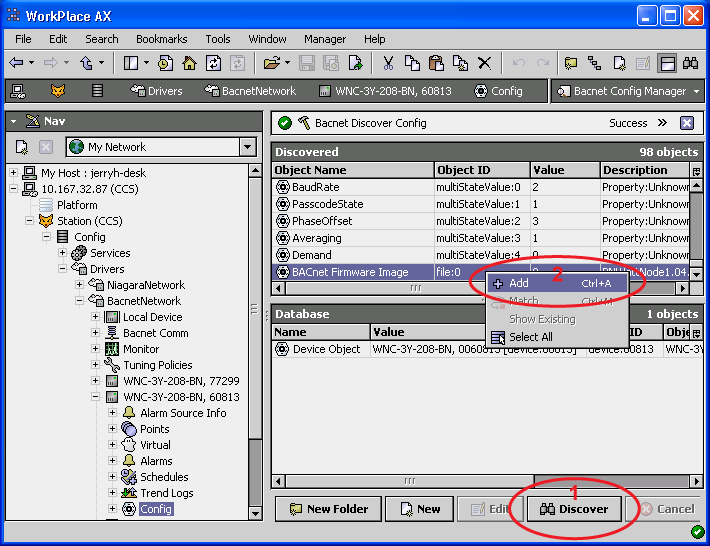
- In the Bacnet Config Manager click on the Discover button (labeled 1 in the figure).
- Wait for the device objects to be discovered. The device objects will appear in the Discovered window.
- Scroll down to the end of the list to find the file object BACnet Firmware Image at the bottom of the list.
- Click to highlight BACnet Firmware Image.
- Then right-click and select Add (labeled 2 in the figure).
- In the Add popup accept the defaults by clicking OK.
Enable File Write
Enable object file write for BACnet Firmware Image as described in the steps below and illustrated in Figures 7, 8 and 9.
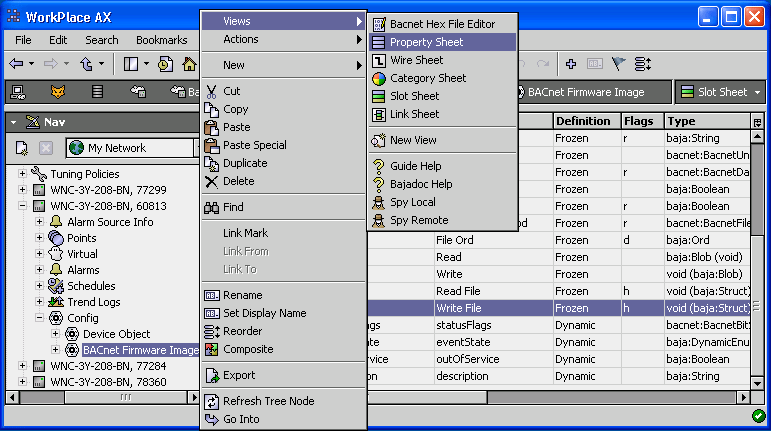
- In the Nav pane, expand the Config folder (1).
- Right-click on the BACnet Firmware Image (2).
- Select Views (3)
- Select Slot Sheet (4)
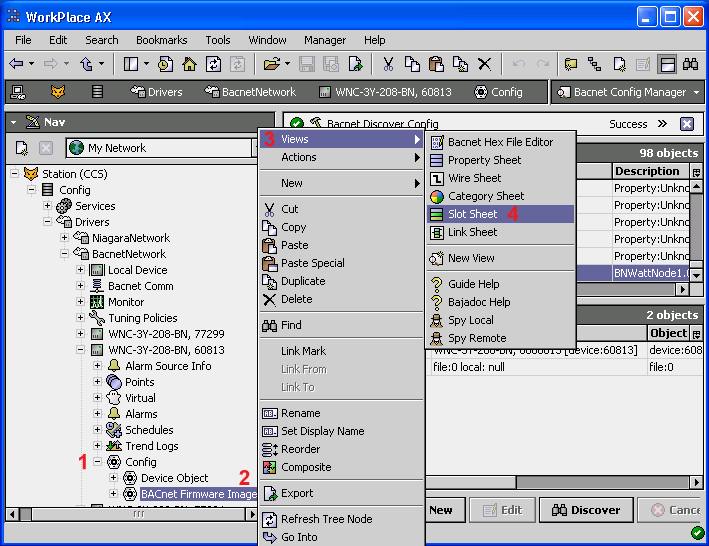
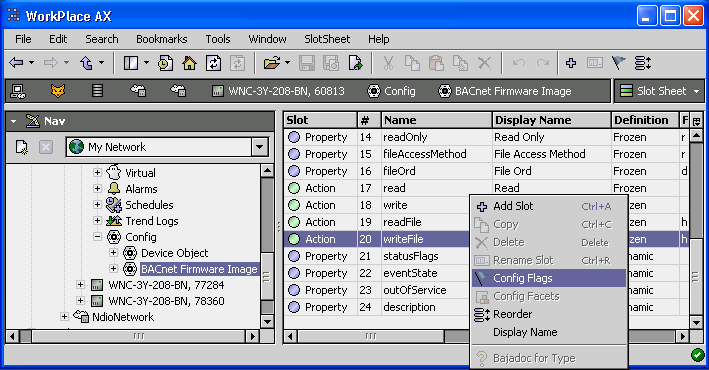
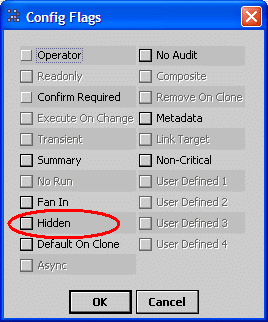
- In the Slot Sheet window right-click the writeFile slot and click Config Flags:
Setup File Location
Add the location of the file to be downloaded to the BACnet Firmware Image as described in the following steps and illustrated in Figures 4, 5 and 6.
- In the Nav pane, under Config, right-click on BACnet Firmware Image, and select Views > Property Sheet.
- On the line labeled File Ord, click on the small triangle pointing down at the far right.
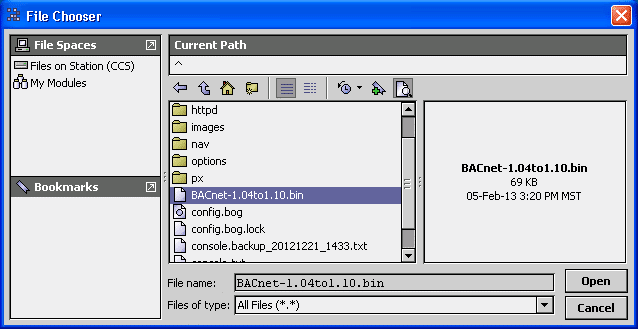
- Select File Ord Chooser from the pop up.
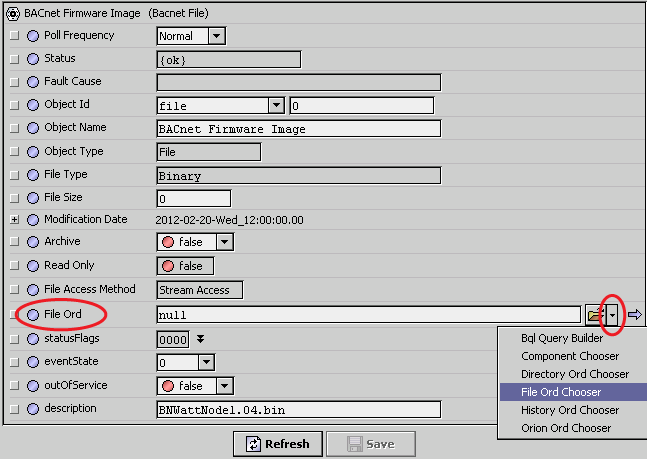
- Select the file to be downloaded from the Files on Station directory and select Open.
- Click on Save in the Property Sheet.
Set the File Size
These steps are only required when upgrading from firmware versions V1.04 or V1.04A. When upgrading from version V1.10 or later, you can skip setting the file size and proceed directly to update the firmware.
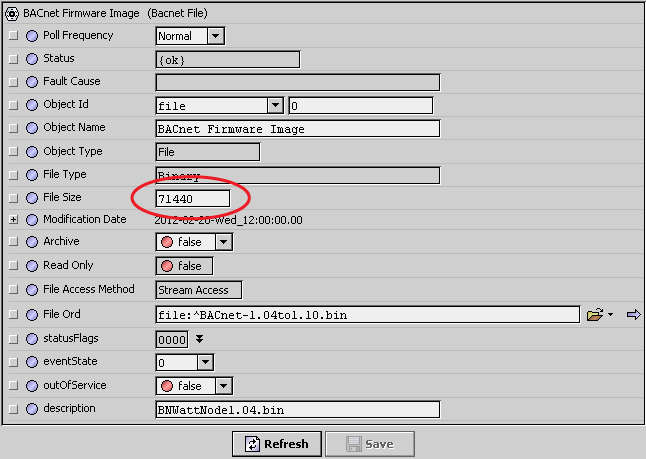
- On the BACnet Firmware Image property sheet, in the File Size box enter the file size based on the version of firmware being installed as shown in the table at the top of this page (e.g. for BACnet-1.04to1.13.bin, enter 75024).
- Press Enter or click the Save button.
- The File Size may read back as zero indicating the internal memory is being prepared for the new image.
- When ready for file download the File Size will read back (click Refresh button) as the entered File Size. This may take up to fifteen seconds if a previous file download had been attempted.
- If you are unsure the new file size has been written correctly, you may enter it again.
Update Firmware
Proceed to update the firmware in the WattNode by writing the file as described in the following steps and illustrated in Figures 11 and 12.
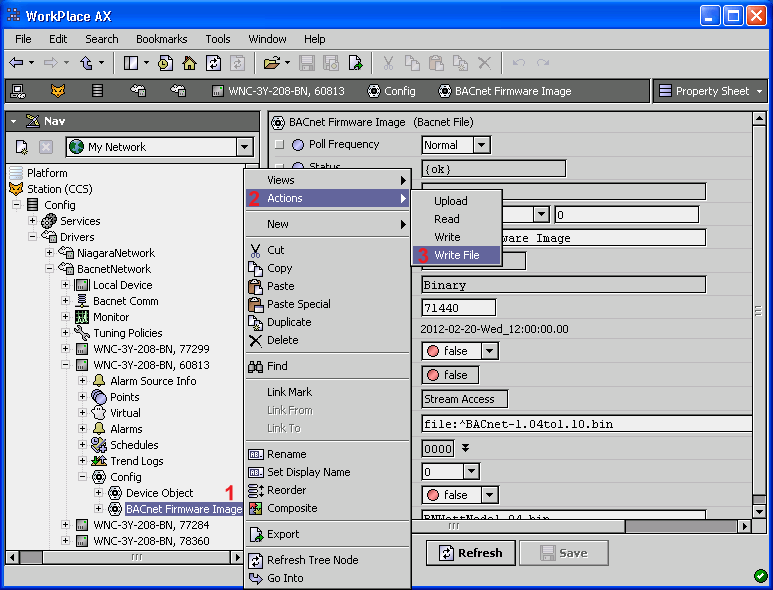
- In the Nav pane, under Config, right-click on BACnet Firmware Image and select Actions > Write File.
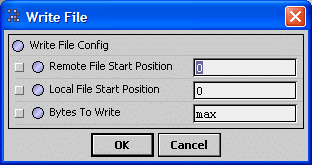
- In the Write File popup click OK to start file write:
- The file write will begin and the mouse will show a busy icon.
- At baud rate of 38,400 it will take approximately 45 seconds for the transfer. At 76,800 baud, it takes about half as long.
- Once the firmware has been transferred to the WattNode meter, the meter will reprogram itself, which takes anywhere from 5 to 30 seconds (depending on which version you are upgrading from), during which the WattNode LEDs will transition through several different color and flashing patterns. At the end of a successful upgrade, the normal green flashing will resume. Interrupting line power during the upgrade will leave the firmware partially programmed, requiring that the meter be returned to CCS for reprogramming.
- After the upgrade is complete, if you check ErrorStatus1, you may see the INFO code 1032, which indicates that the meter completed a reboot following a firmware upgrade.
Retry
If you get a “Write File” error, there are a couple of possible causes:
- The file size is incorrect.
- The WattNode meter was busy erasing the flash memory it needs to store the new firmware image
If this happens, try writing the file size again; wait 20 seconds; then try the “Write File” operation again.
Troubleshooting
- If the LEDs stay off or are very dimly lit after the upgrade, then the firmware has become corrupted and the meter will need to be returned to CCS for reprogramming.
- When upgrading from V1.04 or V1.04A, if file size is set too small or too large, the file download will fail. The firmware will not be updated.
- If the file download takes longer than one minute (programming at 9600 baud or 19200 baud) the JACE will terminate the file write.
Update Changed Objects
IMPORTANT NOTE: If you are upgrading from 1.04 or 1.04A to 1.10 (or later), the list of objects has changed and some properties have changed (see WattNode BACnet Object Changes V1.10). If you are using ANY of the affected objects, you must rediscover or update your templates.
There are three types of discovery for BACnet objects using the JACE.
- From the Bacnet Device Manager, the Discover button will scan the devices on the network.
- This will also read the “Firmware Rev” and update it for any updated devices. Use this to verify that the upgrade completed successfully.
- From the “Bacnet Point Manager” for a given BACnet device, like the WattNode, the Discover button will scan the objects and properties within a device. You should use this to update the points for a WattNode after performing a firmware upgrade.
- You may either delete all the existing points and replace with the newly discovered points.
- Alternatively, you may delete only the affected objects (see WattNode BACnet Object Changes V1.10); then perform Discover and add back in the objects you want.
- From the “Bacnet Config Manager” for a given BACnet device, like the WattNode, the Discover button will scan the objects and properties within a device. You should use this to update the configuration points for a WattNode after performing a firmware upgrade.
Verify Firmware Update
Once you have discovered the upgraded WattNode meter and variables, there are at least two places you can look to verify the new firmware version:
- From the Nav pane, double-click BacnetNetwork to open the Bacnet Device Manager, which will show the “Firmware Rev” for all the devices.
- From the Nav pane, under BacnetNetwork, expand the meter you just upgraded, then expand the Config node, and double-click the Device Object. This will bring up all the device object properties, which include “Firmware Revision”.